This is part 3 of a 3-part series.
- Cisco Management Tunnel.
- Cisco Management Tunnel - NDES Setup
- Cisco Management Tunnel - ASA Setup
If you’ve stuck with me so far, now we come to the payoff - a working Management Tunnel! Let’s jump in.
This article is based on my jot notes. There may be missing steps or information, although I’ve tried my best to make sure everything is here, at least at a high-level. I use a mix of CLI and ASDM when working on the ASA, so be prepared to jump around a little.
Requirements
- Requires ASA 9.0.1 (or later) and ASDM 7.10.1 (or later)
- Connects whenever the user initiated VPN tunnel is disconnected, before or after user login. The Management VPN tunnel is not established when a trusted network is detected by the Trusted Network Detection (TND) feature or when an AnyConnect software update is in progress.
- Disconnects whenever the user initiates a VPN tunnel, before or after user login.
- Uses only machine store certificate authentication.
- Requires split-tunneling configuration, by default, to avoid impacting user initiated network communication (since the management VPN tunnel is meant to be transparent to the end user).
- Works with backup server list.
- Currently available only on Windows and macOS. Linux support will be added in subsequent releases.
Install Certificates
If you don’t already have your Issuing CA certificate installed on the ASA, you’ll need to do that. I used the ASDM: Device Management > Certificate Management > CA Certificates. We can import it directly from the NDES/SCEP server we just set up by clicking ‘Add’ and entering the proper information. It should be something like: http://10.0.0.1/certsrv/mscep/mscep.dll
Note: We will need two Profiles - one for Users to authenticate to and get the certificate, and one for the actual Management Tunnel. I’ll call it the User Tunnel just to be clear, and we’ll work on it first.
Create a new VPN Connection Profile
Create a new VPN Connection profile on the ASA via. ASDM. I called mine “Helpdesk”, since that’s who my pilot testers will be. I don’t want to mess around with the production VPN that 100+ users are connected to!
- Set the Authentiction method
AAA and certificate.- Also configure the AAA Server group. You can use LOCAL, or if you’re tied into another authentication service for MFA, like RSA, you can select it.
- Configure DHCP, DNS and the domain name
- Enable SCEP Enrollment (Advanced\General)
Set Group Policy to use SCEP
The Group Policy will need to be edited as well. Either edit an existing one, or create a new one and associate it with the previously created Connection Profile. I did this via. CLI, under a group policy named Helpdesk: group-policy Helpdesk attributes scep-forwarding-url value http://server.corp.company.com/certsrv/mscep/mscep.dll exit I prefer the CLI for this because it gives instant feedback about the success or failure. If you happen to disregard the requirement that NDES is NOT installed on your CA, then this step will repeatedly fail. …Or so I’ve heard :)
Edit Client Profile
These next steps are best done in the ASDM, because the output is XML files. CLI cannot manipulate them directly.
- Open the Client Profile that you’ll use for the User Tunnel - mine is called ‘Helpdesk’.
- Open the Preferences (Part 2) page.
- Enable ‘Automatic VPN Policy’
- Add your internal Trusted DNS Domains and Servers. If you have multiple, separate them with commas.
- Trusted Network Policy = Disconnect
- Untrusted Network Policy = Connect
- Open the Certificate Enrolment page.
- Enable Certificate Enrollment
- Set the Certificate Expiration Threshold (days).
- Enter
%USER%or%MACHINEID%in the Name (CN) box. Either will work, but will affect whom the certificate is issued to (machine name or user id), which in turn will affect how the endpoint shows up in the VPN monitoring logs. - Enter whatever you’d like under Department, but we will reuse this entry later on. I chose
AnyConnectfor the sake of simplicity. - Enter your domain name in the CA Domain field:
corp.company.com - Enter the keysize. I recommend
2048, which is what NDES should be expecting in the certificate request. - Complete any other certificate fields you’d like as they’re optional, but nice to have completed.
- Open the Certificate Matching page.
- Click ‘Add’ under the ‘Distinguished Name (Max 10)’ section.
- Select OU in the Name drop down box. Then type in the value you entered for OU in the last step (under Certificate Enrollment) ito the Pattern field. For me, it’s
AnyConnect. - Ensure ‘Match Case’ is enabled. Click OK and you’ll see the entry appear under ‘Distinguished Name (Max 10)’.
- Click OK as we’re done. This process will allow the ASA to select the correct cert during authentication.
Create the Management Tunnel Group, Group Policy
Back to the CLI! We’ll create a Management Tunnel Profile, and link it to our existing Split-Tunnel list. Please note, the Profile name is case-sensitive!
group-policy Management internal
group-policy Management attributes
 dns-server value 192.168.1.23 192.168.1.24
 vpn-tunnel-protocol ssl-client
 split-tunnel-policy tunnelspecified
 split-tunnel-network-list value VPNSplitTunnelList
 default-domain value corp.agricorp.com
 client-bypass-protocol enable
 address-pools value SSLVPNDHCP
 anyconnect-custom ManagementTunnelAllAllowed value Value

tunnel-group Management type remote-access
tunnel-group Management general-attributes
 default-group-policy Management
tunnel-group Management webvpn-attributes
 group-alias Management enable
 group-url https://vpn.company.com/Management enable
The ‘Client Bypass Protocol’ needs to be enabled if you don’t have BOTH IPv4 and IPv6 address pools configured to issue IP addresses. If you only have IPv4, like me, then the Client Bypass Protocol must be enabled. If it’s not, and the everything else is configured correctly, you’ll see the Management Connection State show as “Disconnected (invalid VPN configuration)”
Create the Management Tunnel Profile
Back to ASDM! Add an AnyConnect Client Profile under Remote Access VPN > Network (Client) Access > AnyConnect Client Profile:
- Enter a Profile Name
- Select ‘AnyConnect Management VPN Profile’ from the Profile Usage dropdown box. The resulting profile will have an
.vpnmextension. - Select the previously created User VPN Group Policy. In my case, it’s
Helpdesk. This associates the two policies, and when a user authenticates toHelpdesk, it’ll download the Management Tunnel profile as well.
Now, edit the Management VPN Profile:
- Open the Preferences (Part 2) page. Per Cisco: “For a consistent user experience, we recommend that you use identical Trusted Network Detection settings in both user and management VPN tunnel profiles.”
- Enable ‘Automatic VPN Policy’
- Add your internal Trusted DNS Domains and Servers. If you have multiple, separate them with commas.
- Trusted Network Policy = Disconnect
- Untrusted Network Policy = Connect
- Open the Certificate Matching page.
- Click ‘Add’ under the ‘Distinguished Name (Max 10)’ section.
- Select OU in the Name drop down box. Then type in the value you entered for OU in the last step (under Certificate Enrollment) ito the Pattern field. For me, it’s
AnyConnect. - Ensure ‘Match Case’ is enabled. Click OK and you’ll see the entry appear under ‘Distinguished Name (Max 10)’.
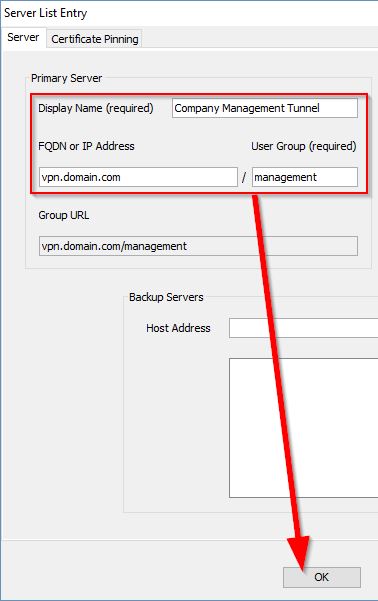
- Open the Server List page.
- Click Add. Enter a Display Name (which doesn’t seem to actually be used anywhere else).
- Under FQDN, enter the same value that’s in your User Tunnel - vpn.company.com for example.
- Under User Group, enter the Management VPN Tunnel Alias (configured under the Management Tunnel Group). In my case, it’s
Management.

- Click OK until you’re back at the main ASDM page, then click Apply to write the changes.
At this point, everything should be setup. Let’s test.
Management Tunnel Behaviour
Load AnyConnect and establish a connection to your User Tunnel as usual. After successfully connecting, the ASA will contact the NDES for certificate enrollment on your behalf. After a few seconds, AnyConnect will issue a notice:
popup-certificate-enrollment-succeeded.png)
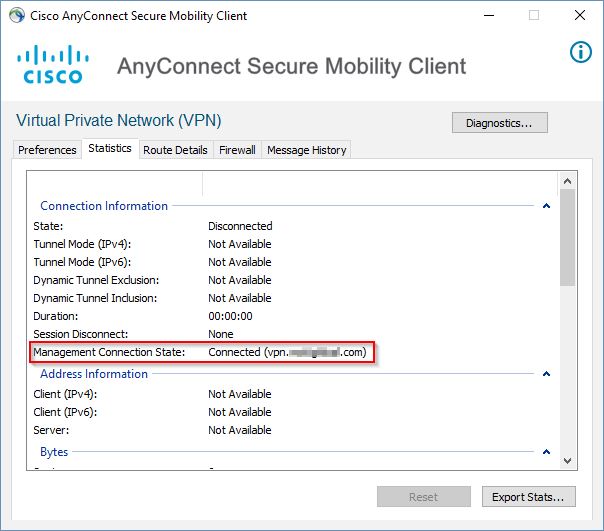
Click OK to acknowledge the notice. AnyConnect will indeed disconnect you and try to re-establish a connection. You can either authenticate and establish a User Tunnel, or click Cancel. If you click Cancel, AnyConnect will take a few minutes to perform Trusted Network Detection, determine you’re not on the corporate network, then transparently establish the Management Tunnel using your certificate. You can see the Management Tunnel status in the AnyConnect client Statistics:

When you connect back to a User Tunnel, the Management Tunnel will disconnect and show Disconnected (user tunnel active).
Behind The Scenes
AnyConnect actually grabs 2 certificates based on your VPN username and stores them in Local User Certificates\Personal\Certificates and Local Machine Certificates\Personal\Certificates. If you created a standard certificate template, NDES issues them with a 1 year validity period. However, AnyConnect inspects the ‘Date Issued’ field and compares the age to the value set under Certificate Expiration Threshold (days). If the value = 2, then if the certificate is older than 2 days, AnyConnect will request another certificate the next time a VPN session is established.
If you need to delete your certificates during testing and pilot use:
-
- Stop the Cisco AnyConnect service
- Open up the certificates mmc (mmc.exe). Add both the Current User plugin and the Current Machine plugin.
- Delete the certificate in Local User Certificates\Personal\Certificates
- Delete the certificate in Local Machine Certificates\Personal\Certificates
- Start the Cisco AnyConnect service again
I also had to adjust the Dynamic Access Policy in use by the User Profile. We were checking for the presence of a certain AV product, but it was causing problems. Now we don’t check that, but check for other things.
I also originally set anyconnect-custom-data ManagementTunnelAllAllowed Value true/true based on another article I’d read, but this is not necessary.
References
Some articles I referenced when figuring this out were: